Cooking Healthy For Your Baby

Tuesday, January 25, 2011

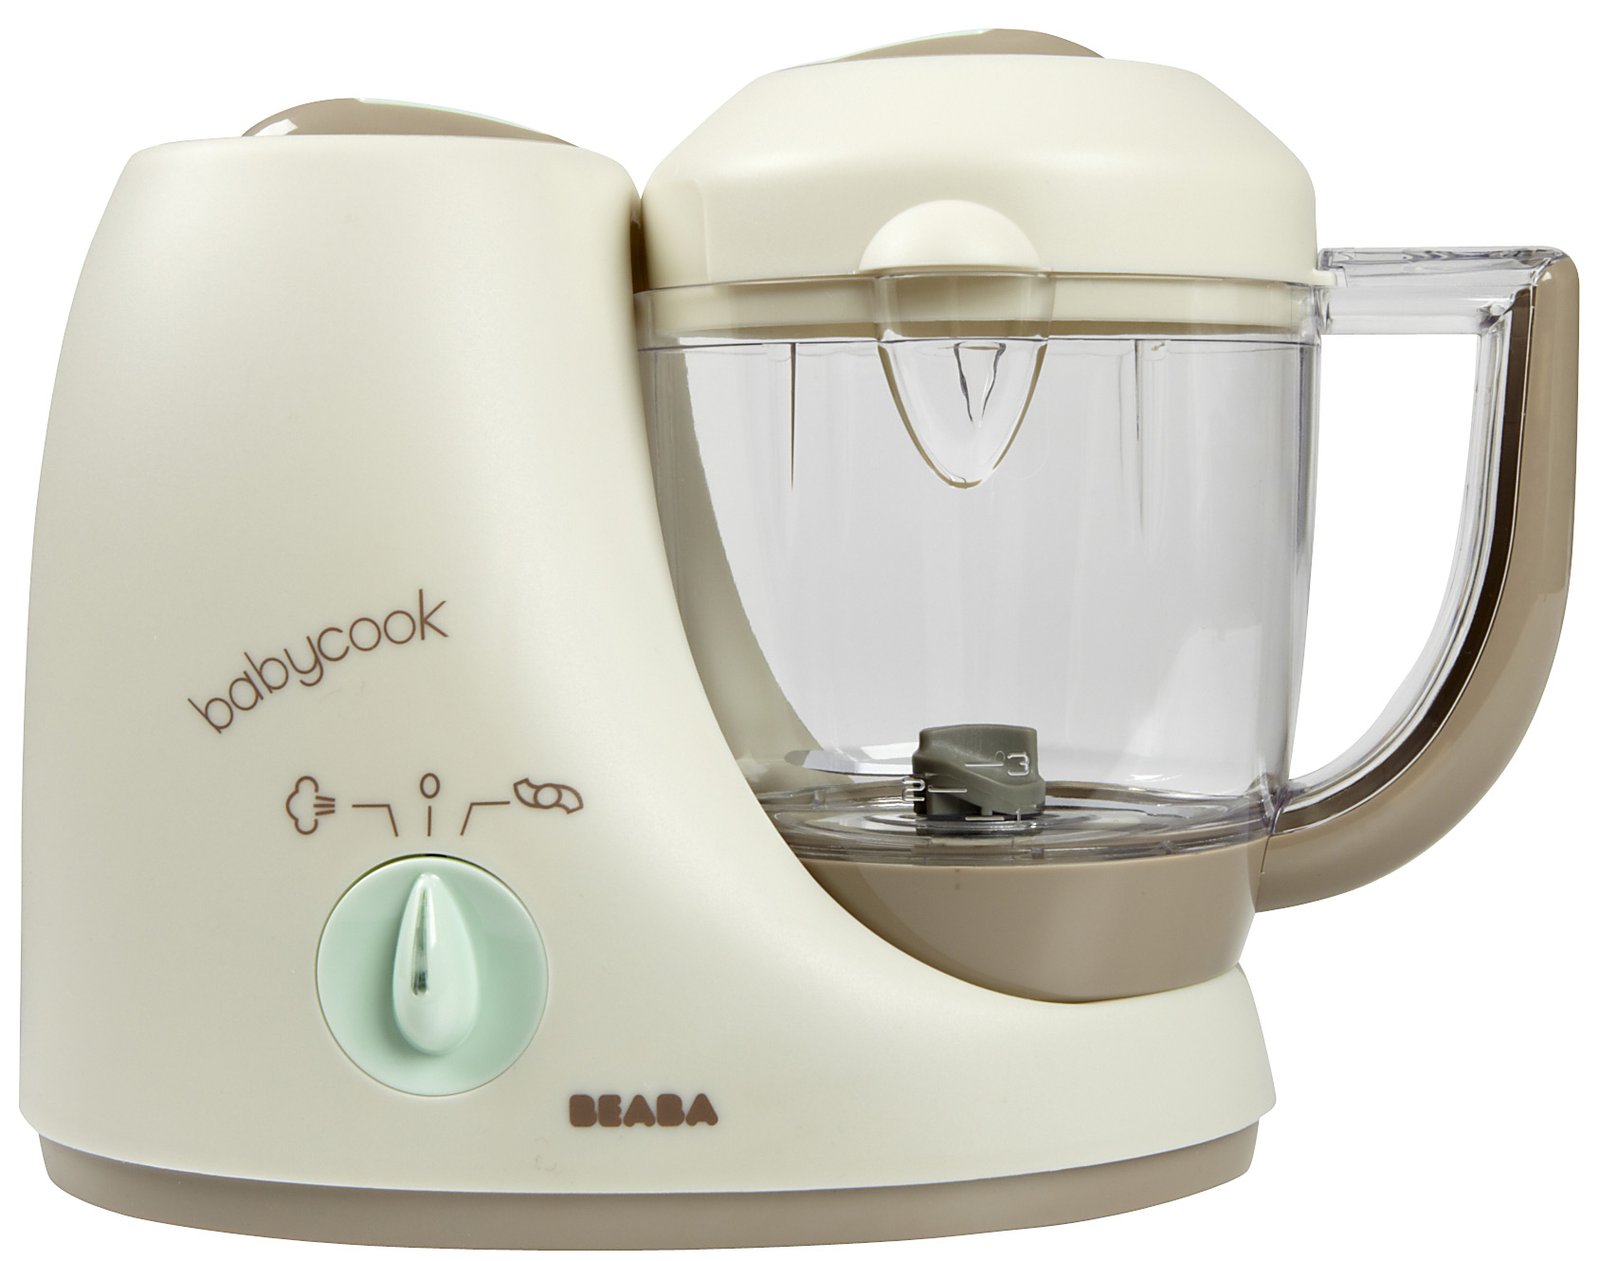
I have a wonderful friend who is expecting and therefore I am into looking at "all things baby." Today I came across this amazing appliance made by BEABA called "Babycook." We all know how much I love to cook, and when I do decide to start a family, this will be on my wishlist! Until then, I decided to share it with all of you.


This functions as a steamer, blender, warmer and defroster to help you prepare fresh meals for your baby. It starts by steam cooking vegetables, fruits, and meats in less than 15 minutes, while preserving their vitamins and flavors. It then purees or blends them to the desired consistency. Parents can also use it to quickly reheat or defrost precooked foods. Sounds like dinner magic!


Creatively Chic....and a little crazy

Dream Farm - Gadgets of the Week

Monday, January 24, 2011

I recently discovered a new website which I absolutely love. I think I could order every gadget on there! I'm a fan of innovative things and this place is teeming with them!

First up is the Scizza - scissors made for cutting pizza! They also have a variety of uses around your house, but I want this mainly for pizza. I hate how you have to roll the pizza cutter back and forth, it never seeming to make progress!
Next up is the Tapi. This device mounts onto your kitchen faucet and with a slight squeeze creates an instant water fountain! No more dirty dishes to grab a quick drink! I think this would be great for kids!


And there you have it, awesome gadgets your now can't live without!


Creatively Chic....and a little crazy

Safety Meets Fashion

Thursday, January 20, 2011

For those of you who know me well, I am a fan of all things unique! A particular passion of mine is funky, eclectic jewelry. Today while trolling through several websites I came across these bracelets. The more reseach I did, the more excited I became! About five minutes in, and I knew I would be making these. I can't resist the urge to try new things just to see how they turn out!


If you're suddenly experiencing a tingling sensation, and the urge to run to Michael's then let me share the instructions so you can make one too!

1. Safety Pins (enough to fit around your wrist)
2. Beads (as much as you want)
3. Super Glue
4. Elastic cord (.7mm or above recommended)

Open the safety pins, and thread beads onto the open prong, leaving enough space to refasten the pin. Repeat the process until all the safety pins have been beaded.

Glue the pin so that it wouldn't open when you'r wearing it.

Next, cut two 12" pieces of elastic cord.

Thread one of the cords through the hole in the top of a safety pin, then through a spacer bead, and then through the hold in the bottom of another safety pin. Continue to thread in this manner until your bracelet is long enough to go around your wrist.

Then, take the second cord and thread it through the bottom of the bracelet, adding a spacer bead between each safety pin.

So have some fun and spice up your wardrobe with a funky accessory!

Creatively Chic....and a little crazy

My Lips are Turning Blue

Tuesday, January 18, 2011

This past summer my Mom and I picked buckets of fresh blueberries from a local farm. I love making blueberry muffins, so I wanted to make sure I had some on hand all winter. Plus, the berries from the farm are twice as big and juicy compared to the ones in the store. Last month my Aunt told me about these chocolate covered blueberries she had received for Christmas, and since then I haven't been able to get the idea out of my head. I MUST make these!

I looked up several different types of recipes, and I think it's just up to your individual preference. Some used semi-sweet, milk chocolate, white chocolate and some even used butterscotch. I decided that I would try the white chocolate, and maybe add a bit of blue food coloring.

Wash and pat dry your blueberries. Simply melt the chocolate of your choice. Drop the blueberries in the chocolate, and lay on a cookie sheet covered in wax paper. Refrigerate until the chocolate sets up.

So there you have it, a little fruity sweetness from my kitchen to yours!


Creatively Chic...and a little crazy

The Importance of Family

Wednesday, January 12, 2011

This past week we drove out to New Mexico for a funeral. While it was a sad occassion, we made the best out of it by visiting with family we had not seen in a long time. One of those visits was to a wonderful lady, whose name is Toni. She is my great aunt. My father's mother died when he was five, and he has not seen my aunt Toni since he was 15, or spent time with that whole side of the family. We decided that it was time to break that cycle, and go meet her.

We pulled up to the house and I could feel my heart pounding, wondering who this woman was, what she was like. I was instantly greeted with a smiling face and pulled into a warm embrace. This was my great aunt. She welcomed us into the house and showed us into her study. Covering up two entire walls was pictures chronicling our family history. My great grandparents, cousins, and second cousins, and  pictures of my grandma. I had only ever seen one. Standing before this monument of family love I couldn't help but become emotional thinking, this is my family, all these people I never knew existed, all this time wasted.

I took a picture of the picture on the wall. My grandma is on the left, Aunt Toni on the right.

My Aunt Toni began telling us stories of her and my grandma from when they were younger, and suddenly I got chills. You know the saying, "you can't escape your genes?" Well I am definitley a believer. Come to find out my grandma was artistic, creative, straight A student with perfectionist tendancies. It sounded as though she was describing me to a T. I've always wondered where I got my artstic streak from, as I seem to be the most passionate about it in my family.


A mosaic my grandma made when she was 10. Toni gave it to my Dad. The only thing we have of my grandma's.

I can't help but wonder what it would have been like if my grandma had lived. I know she made some poor choices in her life, and nobody is perfect. But what would it have felt like if I was standing her in living room, looking at pictures of us on her walls? Would she have been involved in our lives? What could she have taught me? These are things I will never know. But I am so grateful to have met my Aunt Toni, and to have learned some things about my heritage.


Me & Aunt Toni


Creatively Chic...and a little crazy

Holidaze

Monday, December 13, 2010

I haven't been keeping up with my blog as much as I would like here lately. I've been in a "holidaze" trying to get everything finished. I have several neat ideas to share, but will have to wait until after Christmas since some of my followers will be receiving them as gifts this year!
So instead I decided to share a few simple snack recipes that are easy to make and take to any family gathering this year.


Reindeer Feed:

6 cups Rick Chex or Chocolate Chex cereal
1 bag (12 oz) white vanilla baking chips (2 cups)
1/3 cup coarsely crushed peppermint candy canes (14 miniature)

1. Line cookie sheet with foil or waxed paper. Place cereal in a large bowl.

2. In microwaveable bowl, microwave white vanilla baking chips uncovered on High for about 1 minute 30 seconds, stirring every 30 second, until chips can be stirred smooth. Stir in half the crushed peppermint candy.

3. Pour over cereal; toss evenly to coat. Spread mixture in single layer on cookie sheet. Immediatley sprinkle with remaining candy. Let stand until set, about 20 minutes. Gently break up coated cereal. Store in airtight container.

Snow Covered Crunch Bars:
If you love Muddy Buddies you'll love these!

1 pouch Betty Crocker Sugar Cookie Mix 
1 cup butter softened
1 egg
1 pckg semi sweet chocolate chips
2 1/2 cups peanut butter
6 cups Rice Chex Cereal
1/2 to 1 cup powdered sugar

1. Heat oven to 375. Spray 13x9" baking pan with cooking spray. In large bowl, stir cookie mix, 1/2 cup butter and egg until soft dough forms. Press dough in bottom of pan. Bake 10 - 12 min. or until edges are light golden brown. Cool 15 minutes.

2. In large microwaveable bowl, microwave chocolate chips and remaining 1/2 cup butter on High about 1 1/2 min. stiring after 1 minute, until melted and smooth. Add peanut butter, mix until well blended.

3. Place cereal in 1 gallon reseable food storage plastic bag. Using your hands, gently break cereal into small pieces. Gently stir cereal in chcolate mixture until cereal is coated. Spread cereal mixture evenly over cookie crust; gently press. Sprinkle with powdered sugar. Refrigerate about 1 hour or until bars are set.

So bake away and enjoy the holidays!

Creativly Chic....and a little crazy
Love Grows On Trees

Wednesday, December 8, 2010

Last year for Christmas my family gave my grandparents a Memory Jar filled with all our favorite memories involving them. They loved it, and I've been wondering ever since then how we would top it this Christmas. I was looking through a magazine and saw a picture of a painting someone had done of their family tree. The more I thought about it, the more I thought, "I'm going to give it a try and see how this turns out."

Now, I'm not very good at painting - but Grandparents are supposed to love whatever their grandkids make, right? I figured if I could do this, anyone could! I decided to document the process and give you step by step instructions in case you wanted to create one for yourself or a gift!

I bought a 20 x 24 canvas. I went with a cheap canvas since most people don't know the difference. Then I put a base layer down, but didn't cover the whole canvas. I also stuck with acrylic paints. They are cheap, easy to use, and dry quickly.

I added a darker color and repeated the same process.

Next I took a pencil and outlined my tree on the canvas.

I put down my first layer of brown for my tree.

I added a second layer and expanded some branches.

I then added my leaves.

I went back in with a small brush and added a darker color of green to the leaves, and some highlights around the tree branches.
I went back with black paint and added dimension to the tree, wrote everyone's names around the leaves, and added "Our Family" at the bottom! This is an inexpensive, but priceless gift!

Creatively Chic.....and a little crazy